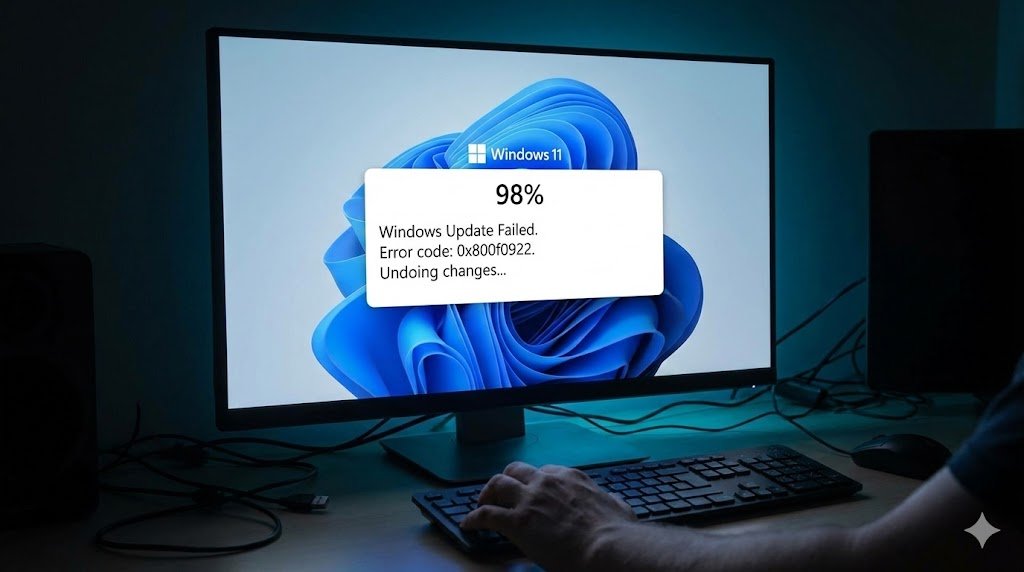
There is nothing more frustrating than watching a Windows 11 update reach 98%, only to abruptly fail, display the message “Undoing changes,” and throw the Install Error 0x800f0922. This issue has become incredibly common with the recent 2026 Security Updates (like KB5074109 and KB5077181), trapping thousands of users in endless reboot loops.
The most common cause of the 0x800f0922 Windows 11 update error in 2026 is a full EFI (System Reserved) Boot Partition. Modern security updates require space in this hidden partition, but it often gets clogged with old BIOS update files or language fonts. You can easily fix this by using the Command Prompt to mount the partition and delete the unnecessary font files. Other common causes include disabled .NET Frameworks or corrupted Windows Update cache folders.
Let’s break down the exact, step-by-step methods to force these stubborn Windows 11 updates to install successfully so you can stop dealing with the dreaded rollback screen.
Method 1: Clear the Hidden EFI Boot Partition (The 2026 Primary Fix)
By examining the CBS.log file of users experiencing this exact error with the latest 2026 cumulative updates, the root cause is frequently a ERROR_DISK_FULL flag in the hidden 100MB boot partition.
Windows cannot add the necessary boot-level security files because the drive is completely full. You must mount it and clear out unneeded font files.
- Click the Windows Start button, type
cmd, right-click Command Prompt, and select Run as administrator. - Type the following command to mount the hidden partition to the “Y” drive and press Enter:
mountvol y: /s - Switch to the new drive by typing:
y: - Navigate to the font folder by typing:
cd EFI\Microsoft\Boot\Fonts - Delete all the font files (these are unused language fonts that unnecessarily bloat the boot drive) by typing:
del *.ttf - Finally, unmount the drive by typing:
mountvol y: /d - Restart your PC and try running Windows Update again. In most cases, it will now install flawlessly.
Method 2: Reset the Windows Update Components Manually
If the update downloaded incorrectly, it sits corrupted inside your SoftwareDistribution folder. Every time Windows tries to install it, it hits a broken file and aborts with error 0x800f0922. We need to clear this cache.
- Open Command Prompt as an administrator.
- Stop the core update services by typing these four commands, pressing Enter after each:
net stop wuauservnet stop cryptSvcnet stop bitsnet stop msiserver
- Rename the corrupted folders to hide them from Windows (forcing the OS to create fresh, clean ones):
ren C:\Windows\SoftwareDistribution SoftwareDistribution.oldren C:\Windows\System32\catroot2 Catroot2.old
- Restart the update services:
net start wuauservnet start cryptSvcnet start bitsnet start msiserver
- Close the Command Prompt, reboot your PC, and click “Check for Updates.”
Method 3: Fix .NET Framework Installation Errors
Windows 11 updates rely heavily on the Microsoft .NET Framework. If this framework is disabled or broken, the update will immediately fail.
- Press
Windows Key + Rto open the Run dialog. - Type
optionalfeatures.exeand press Enter. - The “Windows Features” box will appear. Look for .NET Framework 3.5 (includes .NET 2.0 and 3.0) and .NET Framework 4.8 Advanced Services.
- If they are unchecked, check them. If they are already checked, uncheck them, click OK, and restart your computer. Then, go back in and re-check them to force a fresh download.
- Once completed, attempt the Windows Update again.
Method 4: Run SFC and DISM to Repair System Image
If malware or a previous bad update corrupted your core system files, the update engine won’t trust your system enough to install critical security patches.
- Open Command Prompt as an administrator.
- Type
DISM /Online /Cleanup-Image /RestoreHealthand hit Enter. Let it run to 100%. This repairs the underlying Windows image using Microsoft’s servers. - Once done, type
sfc /scannowand hit Enter. This will comb through your local OS files and replace any broken ones. - Restart your computer.
(Note: If you recently used command prompt repair tools to fix game errors, like when trying to resolve the Steam 0xc0000142 application error, you are already familiar with how powerful these DISM and SFC scans can be for system-wide stability).
Method 5: The “Unsupported Hardware” / TPM 2.0 Bypass Issue
If you installed Windows 11 on an older, unsupported PC by using a tool like Rufus to bypass the TPM 2.0 and Secure Boot requirements, this might be why your update is failing. Starting in late 2025 and moving into 2026, Microsoft has begun heavily enforcing hardware checks during security updates. If your system lacks a physical TPM 2.0 chip, updates like KB5074109 may automatically fail with error 0x800f0922.
(If you are also a gamer, you likely already know how strict these hardware security requirements have become. For example, Riot Games strictly enforces these same hardware rules, which is why users frequently run into the Valorant VAN 1067 error on Windows 11 if their BIOS isn’t properly configured). The Fix for Unsupported PCs: If your hardware is officially unsupported, the only reliable way to install these stubborn updates is to download the latest Windows 11 ISO from Microsoft, mount it, and perform an “In-Place Upgrade” (selecting the option to “Keep personal files and apps”). This forces the new update into the system manually.
Frequently Asked Questions (People Also Ask)
1. What does error 0x800f0922 mean in Windows 11? Error 0x800f0922 indicates that Windows Update could not complete the installation of a cumulative or security patch. The system aborts the process and rolls back the changes, usually due to a full System Reserved partition or corrupted update cache.
2. How much space does the System Reserved partition need? The EFI/System Reserved boot partition should ideally have at least 500 MB of total space, with roughly 100 MB to 200 MB completely free for Windows Update to write temporary boot-level files during the installation process.
3. Will resetting Windows Update delete my files? No. Resetting the Windows Update components (by renaming the SoftwareDistribution folder) only deletes the temporary installation files for pending updates. None of your personal files, photos, or installed apps will be affected.
4. Why is my Windows 11 update stuck at “Undoing changes”? When error 0x800f0922 occurs, Windows realizes the installation failed. To prevent your PC from becoming unbootable, it safely reverses the process (“Undoing changes”). Do not force shut down your PC during this phase, or you risk corrupting Windows.
5. Does a VPN cause the 0x800f0922 update error? Yes, it can. If your VPN drops connection or routes traffic through a blocked proxy while Windows is trying to verify the update package with Microsoft’s servers, the connection timeout can trigger this exact error code. Disable your VPN before updating.
6. How do I manually install a failed Windows 11 update? If the automatic updater is broken, you can go to the Microsoft Update Catalog website, type the KB number of the failing update (e.g., KB5074109) into the search bar, download the standalone .msu file, and run it manually.
7. Can third-party antivirus software block Windows Updates? Yes. Extremely aggressive third-party antivirus programs (like BitDefender or McAfee) can mistakenly flag new Windows system files as malicious and block them from writing to the system folder, causing an 0x800f0922 failure. Temporarily disable them while updating.
8. Why does .NET Framework cause update errors? Many internal Windows 11 applications and background services are built on the .NET framework. If the framework on your PC is an older version or has corrupted registry keys, the new update cannot hook into the OS properly.
9. Can I use the Media Creation Tool to fix update errors? Yes. This is called an “In-Place Upgrade.” By downloading the Windows 11 Media Creation Tool and choosing to “Upgrade this PC now” (while keeping files and apps), it effectively reinstalls the OS with the latest updates already baked in, bypassing the standard updater entirely.
10. What is the SecureBootEncodeUEFI task error? Sometimes, a scheduled background task related to Secure Boot gets corrupted in the Windows Registry. This prevents security patches from verifying the UEFI environment. Deleting the corrupted task GUID in the Registry Editor is required to fix this specific variant of the error.