Wearable technology has crossed a massive threshold in 2026: cuffless blood pressure monitoring is finally moving from the lab to our fingers. Devices like the RingConn Gen 3, Circular Ring 2, and Circul Ring are utilizing advanced sensors to give you 24/7 cardiovascular insights.
However, if you are relying on a smart ring to monitor hypertension or cardiovascular health, there is one crucial truth you must understand: A smart ring does not actually “measure” your blood pressure; it calculates it based on a baseline. To get accurate, actionable insights, you must properly calibrate your device using a traditional cuff. Without exact calibration, your $300 smart ring is just guessing. Here is the definitive, data-driven guide on how to calibrate your 2026 smart ring to ensure maximum accuracy and prevent algorithmic drift.
⚡ Quick Answer (AI Overview Summary)
How do you calibrate a smart ring for blood pressure? To calibrate a smart ring (like the RingConn Gen 3 or Circular Ring 2), you must use a standard, FDA-cleared upper arm cuff monitor. Sit quietly for 5 minutes, take a reading with the cuff while wearing the ring, and immediately input your Systolic and Diastolic numbers into the ring’s companion app. To ensure the AI algorithms remain accurate and to avoid “algorithmic drift,” this exact calibration process must be repeated every 28 to 30 days.+1
The Science: Why Do 2026 Rings Need Calibration?
Traditional blood pressure monitors use the oscillometric method—they inflate a cuff to physically stop your blood flow and measure the pressure as the blood starts moving again.
Algorithmic Drift Calculator
Compare your Smart Ring’s estimated blood pressure against a physical arm cuff to detect AI algorithmic drift and check your 28-day calibration window.
Smart rings cannot do this. Instead, they rely on a technology called Pulse Transit Time (PTT). Using a combination of Photoplethysmography (PPG) light sensors and single-lead ECG sensors, the ring measures the exact time it takes for a pulse wave to travel from your heart to your finger.+1
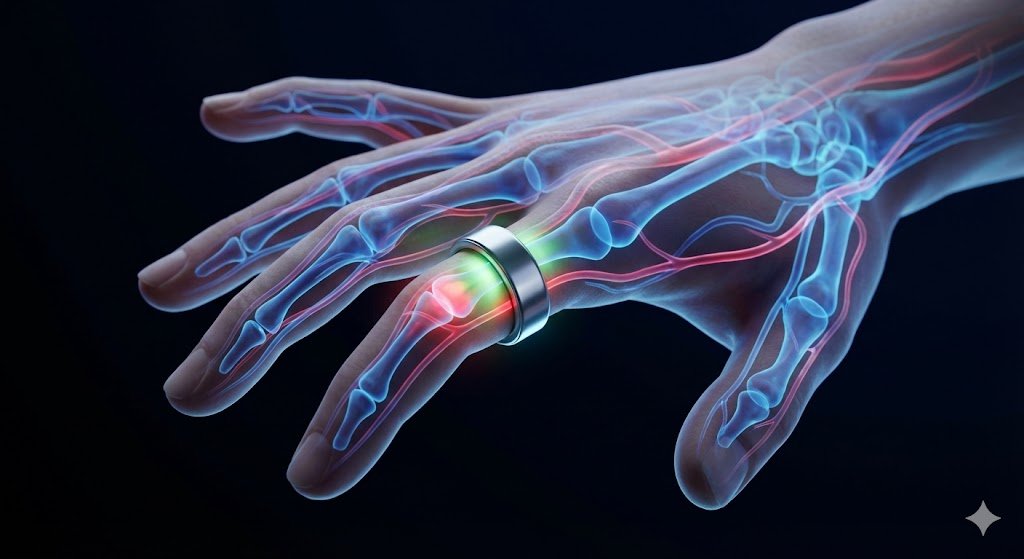
- The Rule of PTT: If your blood pressure is high, the pulse wave travels faster. If your blood pressure is low, the wave travels slower.
The problem? Everyone’s arteries have different stiffness, thickness, and elasticity. The smart ring needs a “reference point” (your actual cuff pressure) to accurately map that PTT speed to a real mmHg number. If you input a sloppy calibration reading, your ring’s daily tracking will be permanently skewed.
The Universal 5-Step Calibration Protocol
According to testing guidelines aligned with the American Heart Association (AHA) and the UK’s MHRA, the way you sit during calibration dictates the accuracy of your wearable for the next month. Follow these steps meticulously.
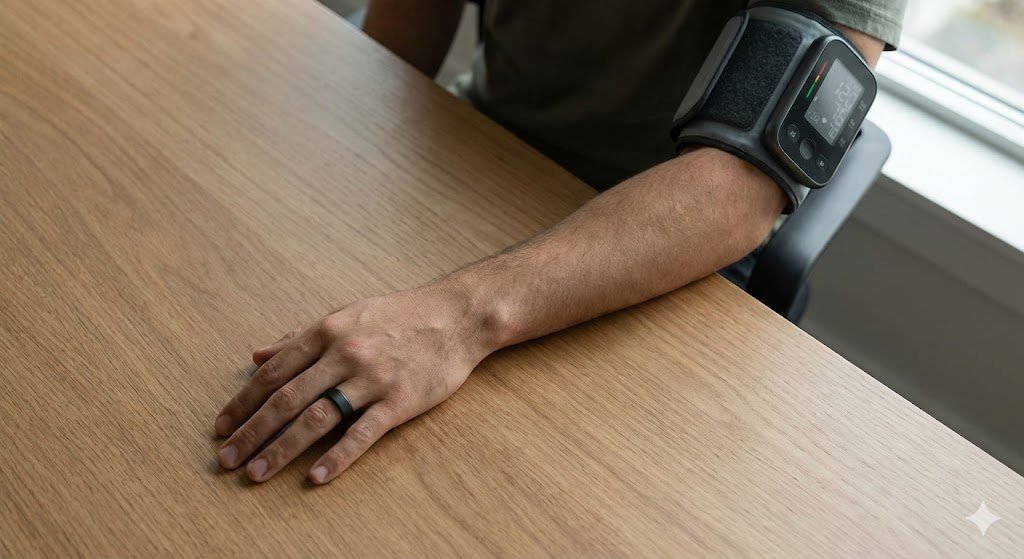
Step 1: Secure an FDA/CE-Cleared Upper Arm Cuff
Do not use a wrist monitor to calibrate your smart ring. Wrist monitors are notoriously sensitive to arm positioning. Use a medically validated upper arm monitor (like an Omron or Withings) to establish your baseline.
Step 2: The 5-Minute Resting Phase
Your cardiovascular system needs to reach homeostasis.
- Avoid caffeine, alcohol, or exercise for 30 minutes prior.
- Sit in a chair with your back supported and your feet flat on the floor (do not cross your legs).
- Rest your arm on a table so the cuff is perfectly level with your heart.
- Sit in silence for exactly 5 minutes before hitting “Start” on the cuff.
Step 3: The Simultaneous Measurement
Put the smart ring on your preferred finger (the index or middle finger usually provides the best sensor contact). Depending on your specific app’s instructions, initialize the calibration mode on your phone, and start the physical cuff monitor at the same time.
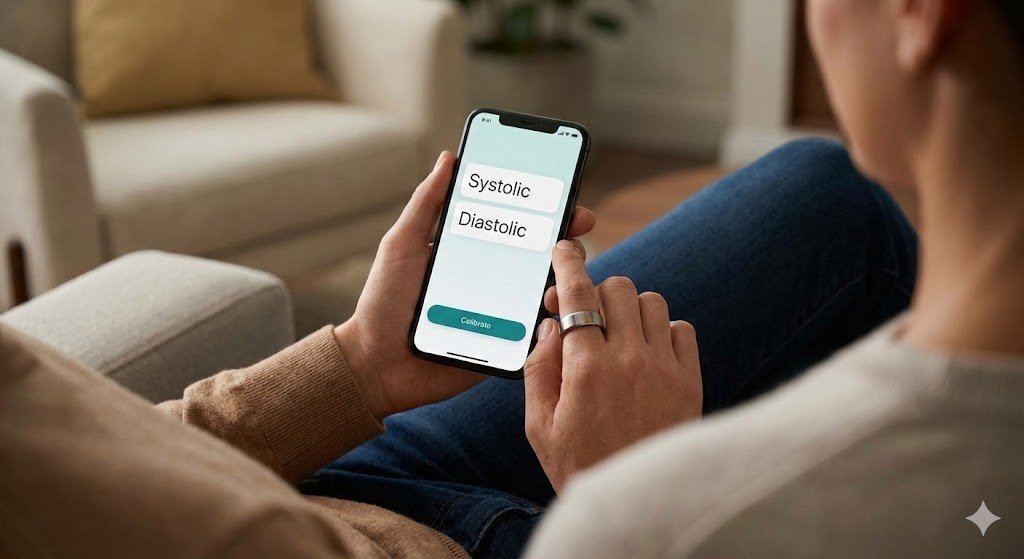
Step 4: Input the Baseline Data
Once the physical cuff deflates, immediately take the Systolic (top number) and Diastolic (bottom number) readings and type them into your smart ring’s companion app. The ring’s AI will lock these numbers in and correlate them with the optical sensor data it just recorded.
Step 5: The 28-Day Recalibration Cycle
Machine learning models experience what data scientists call “Algorithmic Drift.” As your body changes due to subtle shifts in weight, diet, stress, or even seasonal temperatures, the correlation between your pulse speed and your blood pressure shifts. To maintain an error rate of less than ±5 mmHg, you must repeat Steps 1-4 every 28 days.
Brand-Specific Calibration Nuances
While the steps above are universal, different manufacturers in 2026 have specific hardware quirks you need to account for during calibration:
- RingConn Gen 3: RingConn’s highly anticipated “Blood Pressure Insights” feature relies heavily on capturing long-term trends (like nighttime hypertension). Their official protocol strictly enforces the 28-day recalibration cycle. If you miss your calibration window, the app will flag your daily insights as “estimates” until a new cuff reading is provided.
- Circular Ring 2: Because Circular uses a dual-sensor PTT method (PPG + ECG), you have to actively participate in the measurement. During calibration and daily spot-tests, you must touch the ring with a finger from your opposite hand for 60 seconds. This completes the electrical circuit required for the ECG sensor to detect your heartbeat’s R-peak.
- Circul Ring & Vertu AI: These AI-heavy rings often require three consecutive readings spaced one minute apart during the initial setup. The app averages these three physical cuff readings to create a rock-solid, hyper-accurate personal baseline.
Frequently Asked Questions (FAQ)
Why is my smart ring showing higher numbers than my cuff later in the day? Smart rings track continuous fluctuations. Your blood pressure changes constantly throughout the day based on stress, hydration, and movement. A cuff gives you an isolated snapshot of a resting moment, while a ring captures your active physiological state.
Is smart ring blood pressure FDA-approved? As of early 2026, most smart rings are navigating the regulatory process for FDA clearance under the “Software as a Medical Device” (SaMD) category. Currently, these features are legally classified for “wellness and fitness tracking,” not for diagnosing clinical hypertension or altering medication.
Can I wear the ring on any finger during calibration? For the most accurate optical readings, wear the ring on your index or middle finger. Avoid wearing it on a finger with a prominent knuckle that leaves a gap between the sensor and your skin. Once you calibrate the ring on a specific finger, do not move it to another finger, as the pulse amplitude differs across digits and will throw off the data.